고객 서비스

판매자들은 가입하면 더 많은 혜택을 누릴 수 있습니다.

모든 주문 무료 배송.

하드디스크

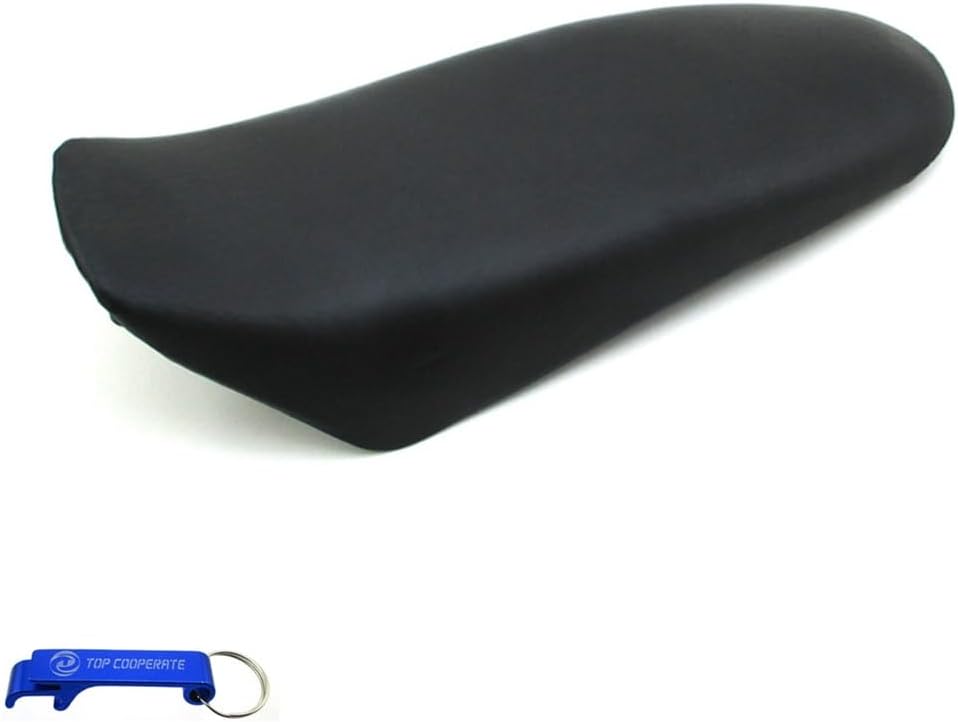
SABRENT USB 3.0 to SATA External Hard Drive Lay Flat Docking Station with Built in Cooling Fan for 2.5 or 3.5in HDD, SSD [Support UASP and 22TB] (EC-DFFN)

4.30

지난 32시간 동안 판매됨 44

$ 31.95
$ 35.00
-9.55%

What's Good About the Sabrent EC-DFFN External Docking Station1. The case is lightweight and well made.2. It works well. I was able to transfer about 500gb of data per hour.3. It's quiet and attractive.4. It utilizes USB 3.0 which is about 10 times faster than 2.0.5. The included cables are just the right length.What's Can Be Improved1. The price. I paid $32 for mine.2. The screens meant to protect your fingers impede the fan's air flow.3. The rubber feet need to be taller to improve the fan's air flow. The current design creates a lot of back pressure that prevents the fan from operating at its full capacity.The Sabrent EC-DFFN external USB 3.0 docking station is well made. However, it can be improved. Read on if you would like to learn how to modify the case and improve its air flow. That's important if you are going to be running your external hard drives for long periods of time like I do.*********************************************ONE WORD OF CAUTION:Take your time, you don't want to damage your docking station's case.Tools You'll NeedA small Phillips head screwdriver, an Exacto knife and a thin knife or a razor blade. All three will work. This modification takes about 15 minutes to complete.Parts You'll Need1. Four — 6 x 3/4" Flat Head Screws (Phillips Head) Note: 6 is the diameter of the screw.(These are used to mount the rubber feet.)2. Four — 6 x 1/2" Pan Head Screws (Phillips Head).(These are used to mount the grill to the fan.)3. Two — 80mm Computer Fan Grills (sometimes listed as 8cm grills).4. Four new rubber feet approximately 1/2" by 1/2" inch is ideal. However, the ones pictured in the photos are 1/2" tall by 3/4" wide (tapered, cone-style feet). I already had those, so that's why I used them.How to Improve the Air Flow on the Sabrent Docking Station(Be sure and refer to the pictures for additional help.)1. First, make sure it's unplugged before you do this modification.2. Remove the rubber feet on the bottom of the case. They are glued in place.3. Remove the screws that you find underneath the rubber feet.4. Remove the screws holding the fan in place and remove the outer screen.5. Use an Exacto knife or a thin knife blade to pry open the bottom of the case.6. With the bottom off, wiggle the fan loose from its four anchor posts.7. Remove the inner fan screen.8. Slide the fan back onto the posts and press into place.10. Reattach the bottom of the case.11. Mount the grill onto the fan by screwing it in place with the Pan Head screws.(Indented side of the grill needs to face outward from the case.)12. Attach the four rubber feet to the corners of case with the Flat Head screws.(You have now completed the modification.)In my opinion, the docking station doesn't need a grill to protect the inward facing side of the fan because the lid and the drive you insert already do that — just be sure and turn off the power before opening the lid. The fan stops spinning in about three seconds, and only runs when there is a standard hard drive installed. It does not run if you insert an SSD drive because they don't get very hot and don't need the extra cooling. The docking station automatically senses if the drive you have inserted is an SSD or standard (spinning disc) hard drive.Note: If you decide you want to install an inner fan grill you can. Just remember it will make the grill on the bottom bulge out another quarter of an inch. If you do install an inner fan grill, be sure and insert it with the indented portion of the grill pointing towards the inside of the case.Things You Need To Know Before You Connect And Use The Sabrent Docking Station1. Insert your hard drive and connect all the cables to the case and your PC before you power it on.2. Turn off the power to the case before you disconnect the hard drive or cables.Note: Once you have powered down the docking station, you do not need to turn your computer off to disconnect it. Think of the docking station as a flash drive you have to power on to use and power off to disconnect.Some Useful Hints You Need To Read Before You Begin This Modification1. Don' t be in a hurry.2. Be careful when you pry open the bottom of the case. If you slip with the knife, you'll scratch it.3. It will be easier to remove the bottom of the case if you use a small, stiff wire that you have formed into a "J-style" hook and slide it into one of the holes left by the removal of screws. Pull up on it as you pry open the base. (A paper clip works great.)IMPORTANT — PLEASE READ:Before you put everything back together, take the appropriate screws (Flat Head or Pan) and semi-install them into the holes in the posts that hold the fan and the rubber feet in place. SCREW THEM IN ONLY HALF WAY to avoid stripping out the plastic threads and then remove them. Doing that, presets the screw hole and makes it easier for you to reinsert them when you do the final installation of the rubber feet and fan grill. However, be careful not to over-tighten them. To work properly, they only need to be tightened to the point that they are snug.One final note, when not in use, turn off your Sabrent Docking Station. It will help extend the life of your hard drives.It's just a guess, but I believe this modification almost triples the air flow — keeping your hard drive nice and cool. That's important if you have tons of data to transfer, as hard drives can get very hot if not properly cooled.By the way, the largest drive I have used in these docking stations is a 10 terabyte drive. So far, they have worked flawlessly.

18 현재 누군가가 웹사이트를 탐색 중입니다.

Style
Hard Drive Converter Lay-Flat Docking Station
수량:
- +

예상 배송 시간: 12~26일(국제), 3~6일(미국)

구매일로부터 45일 이내에 반품이 가능합니다. 관세 및 세금은 환불되지 않습니다.

  • ASIN:

    B013WODZH0

  • BEST_SELLERS_RANK:

    #24 in Enclosures

  • COMPATIBLE_DEVICES:

    Desktop, Laptop

  • CUSTOMER_REVIEWS:

    4.3 4.3 out of 5 stars (8,468) 4.3 out of 5 stars

  • DATA_TRANSFER_RATE:

    5 Gigabits Per Second

  • DATE_FIRST_AVAILABLE:

    August 14, 2015

  • GLOBAL_TRADE_IDENTIFICATION_NUMBER:

    00819921011831

  • HARD_DISK_FORM_FACTOR:

    2.5 Inches

  • IS_DISCONTINUED_BY_MANUFACTURER:

    No

  • ITEM_MODEL_NUMBER:

    EC-DFFN

  • ITEM_WEIGHT:

    9 ounces

  • MANUFACTURER:

    SABRENT

  • MAX_NUMBER_OF_SUPPORTED_DEVICES:

    1

  • MEMORY_STORAGE_CAPACITY:

    6 TB

  • PRODUCT_DIMENSIONS:

    7.24 x 4.88 x 1.89 inches

  • UPC:

    819921011831

안전한 결제를 보장하세요
제품 상세 정보
The SABRENT EC DFFN SATA Lay Flat Docking Station supports the direct insertion of Desktop 2.5"/3.5" SATA Hard Drives. It is a caseless solution that makes swapping hard drives easier than ever before. Plus, now you can take advantage of the lightning speed of USB 3.0 to quickly transfer files up to 5 Gbps! Keep your drives running cool, with Built in cooling fan The docking station features a built in cooling fan that provides increased reliability and lifespan to HDDs by keeping the drives cooler. Features: Supports Standard Desktop 2.5"/3.5" SATA Hard Drives. Supports hard drives up to 22TB. On/Off power switch. LED light indicates Power and Activity status. Hot swappable, plug and play, no drivers needed. Reverse compatible with USB 1.1 & USB 2.0. Transfer Rates Up to 5 Gbps w/USB 3.0 Transfer Rates Up to 480 Mbps w/USB 2.0  System requirements: Available USB 3.0 for high speed data transfer Windows: 2000/XP/Vista/7/8 (Both 32 bit & 64 bit versions) MAC: OS X  Package Contents: SABRENT EC DFFN Lay Flat Docking Power Supply USB 3.0 cable User Manual
고객 리뷰
4.30

(100 점수)

5
9
4
3
3
6
2
13
1
69
댓글 취소
댓글을 남겨주세요

22 논평

I bought this to transfer data off older hard drives to some new ones I had purchased. It works great and I had no problems with it. The blue LED was too bright so I put electrical tape over it (my computer is next to my bed so the bright light was a problem when trying to sleep). The other comments/reviews suggesting modifying it for more air flow make sense but I don't think its necessary if you're only going to be using this enclosure temporarily as-needed.

Issue 1 – Non-Standardized Chips Are Used In EC-DFFN Generation 2 External Hard Drive CasesI was almost locked out from data on two of my 4TB Western Digital Black hard drives that I used for backup data and back up Acronis images. I purchased one EC-DFFN hard drive case in 2023. Initialized and formatted 4TB WD Black hard drives on it. I’ve been backing up data to the 4TB drives on a routine basis. I got 5 more EC-DFFN cases in November 2024 as backup devices in case my original one ever starts to develop issues. What I did NOT know at the time, and have found out since, is that Sabrent does NOT standardize the chips they use in the EC-DFFN cases OR across their product line of other USB hard drive cases. All 5 of my new EC-DFFN cases could not read the data on my 4TB backup drives. Computer Management showed the drive as two partitions of 2TB, not one contiguous 4TB partition. I could not access the hard drive in This PC / My Computer. So, IF my original EC-DFFN external case had stopped working before I discovered this issue, there is NO WAY I would have been able to read and access the data on those 4TB hard drives.Sabrent acknowledges this “issue” when pressed, that the EC-DFFNs have different chips in them depending on what chips they were buying at the time. Their “solution” was for me to first update the firmware on the new (Nov 2024) EC-DFFN cases. Then move the data off my 4TB drives using the first EC-DFFN case I purchased in 2023. Then use the “Clean” command in Windows 10 using the older EC-DFFN case to remove all initialization on the hard drive. Then put the 4TB hard drives in one of the new (Nov 2024) cases and reinitialize and format them and finally move all the data back onto the 4TB drives with the drives being in one of the new (Nov 2024) cases.The bottom line is that these EC-DFFN Generation 2 cases are like having PROPRIETARY cases. Each time Sabrent buys chips from a new source or lot, it renders the new cases not being able to read data on drives that are larger than 2TB. And the “solution” is to move the data off the drive, re initialize it in the newer EC-DFFN drive cases, format it in the new cases, then move the data back on to the drive in the newer EC-DFFN cases, and then throw away the older EC-DFFN cases because they now will not be able to read the drive that its been initialized on the newer EC-DFFN cases. There is a real possibility for your data to get trapped on an external drive if it was initialized and formatted on a EC-DFFN case that stops working and the only cases you have are newer ones with different chips in them.Issue 2 – EC-DFFN Generation 2 Cases, Sabrent Does NOT Recommended On Powered USB HubsFor many years I’ve used Rosewell’s external USB cases with fans and those cases were hooked into an Anker 9-Port AC Powered Hub that then connects to my laptop via a USB A connection. All 4 cases work great to transfer data between the 4 hard drives in the cases (and still work great). Then I purchased several Sabrent EC-DFFN USB cases to use for a specific purpose, backing up data. I liked that the EC-DFFN were quick-access, and I did not have to unscrew and rescrew the external USB case together to insert or remove the hard drive. In the first year of using the EC-DFFN I had not yet discovered the lurking problem because I was just using the EC-DFFN case hooked directly to my computers USB port and not through a hub. Recently I hooked two external EC-DFFN cases to my Anker 9-Port AC Powered Hub and tried to move data from one 4TB WD Black HD to another 4TB WD Black HD and the copy process failed within 5-10 seconds, every time. My Rosewell external USB cases are plugged into this same Anker USB 9-Port AC Powered Hub and have NO issues transferring data between hard drives in my 4 Rosewell cases. With all of those drives powered off, and nothing else in use on the Anker Hub, the EC-DFFN Sabrent cases FAULT out when transferring data from one EC-EFFN case to another EC-DFFN case 100% of the time. Sabrent tried to blame this on my computer and the USB bus (I have a high end $4,000 Lenovo P53) and not their EC-DFFN cases, but that does not old water when I have other cases, the 4 Rosewell for one and 2 SIIG cases also, that ALL CAN transfer data from one hard drive to another hard drive with the external cases plugged into my Anker 9-Port Hub. Also, if this is a KNOWN ISSUE, why does Sabrent not alert the potential buyer on Amazon’s product listing page, on the EC-DFFN’s box, or in the EC-DFFN user’s guide?Let the buyer beware. Know what you are going to be using your external cases for and whether the limitations of that case might be an issue for you and your precious data now or somewhere in the future.

arrived very quickly and for that money is great.The seller is correct and very fast for delivery ...

One of the best enclosure I have ever used, the size is good and looks fancy, the transfer rate goes up to 200Mb/sec, its easy plug and play with no tweaks or softwares setups. Runs up to 24TB SATA HDD. The drive stay at 34 Celsius even with heavy load and it Does not overheat due to the cooling fan. I had it for a year and it still runs fine.Downside are minimal :1- The rubber to handle the enclosure below fell off.2- The fan became a bit loud maybe due to dust collection.I certainly recommend this enclosure and surly will buy more of this.

Great product!
2026-03-07    -Michael M.

It’s easy to use and good value for money.I like that Sabrent provides firmware updates. Tip: Any capacity HDD (even 16 TB+) is now compatible after a simple firmware update if the firmware isn’t up to date. I suggest updating the firmware before simply claiming that the product doesn’t work and leaving negative feedback. The firmware update tool is on the downloads page on the Sabrent website.I booted Macrium Reflect 7 free to clone/image a laptops HDD to a larger capacity SSD and this EC-DFFN Dock did the job perfectly. I updated the firmware from 1.0.4 to 1.1.4 too. I haven’t used it with a 3.5” drive yet.I only had one problem after cloning the HDD to the SSD and although it wasn’t the docks fault, I’ll say it anyway as it may help others: I didn’t set MR to extend/expand the C: (Windows partition) so after cloning the HDD to the SSD there was a large amount of “unallocated space” at the end of the SSD with a partition between it and the C: but thankfully the “Extend Partition Wizard” in “AOMEI Partition Assistant” was able to fix it in seconds. If there’s no partition/s between them then it’s not really an issue as Windows can fix it and you won’t need an app like AOMEI to do it.

What's Good About the Sabrent EC-DFFN External Docking Station1. The case is lightweight and well made.2. It works well. I was able to transfer about 500gb of data per hour.3. It's quiet and attractive.4. It utilizes USB 3.0 which is about 10 times faster than 2.0.5. The included cables are just the right length.What's Can Be Improved1. The price. I paid $32 for mine.2. The screens meant to protect your fingers impede the fan's air flow.3. The rubber feet need to be taller to improve the fan's air flow. The current design creates a lot of back pressure that prevents the fan from operating at its full capacity.The Sabrent EC-DFFN external USB 3.0 docking station is well made. However, it can be improved. Read on if you would like to learn how to modify the case and improve its air flow. That's important if you are going to be running your external hard drives for long periods of time like I do.*********************************************ONE WORD OF CAUTION:Take your time, you don't want to damage your docking station's case.Tools You'll NeedA small Phillips head screwdriver, an Exacto knife and a thin knife or a razor blade. All three will work. This modification takes about 15 minutes to complete.Parts You'll Need1. Four — 6 x 3/4" Flat Head Screws (Phillips Head) Note: 6 is the diameter of the screw.(These are used to mount the rubber feet.)2. Four — 6 x 1/2" Pan Head Screws (Phillips Head).(These are used to mount the grill to the fan.)3. Two — 80mm Computer Fan Grills (sometimes listed as 8cm grills).4. Four new rubber feet approximately 1/2" by 1/2" inch is ideal. However, the ones pictured in the photos are 1/2" tall by 3/4" wide (tapered, cone-style feet). I already had those, so that's why I used them.How to Improve the Air Flow on the Sabrent Docking Station(Be sure and refer to the pictures for additional help.)1. First, make sure it's unplugged before you do this modification.2. Remove the rubber feet on the bottom of the case. They are glued in place.3. Remove the screws that you find underneath the rubber feet.4. Remove the screws holding the fan in place and remove the outer screen.5. Use an Exacto knife or a thin knife blade to pry open the bottom of the case.6. With the bottom off, wiggle the fan loose from its four anchor posts.7. Remove the inner fan screen.8. Slide the fan back onto the posts and press into place.10. Reattach the bottom of the case.11. Mount the grill onto the fan by screwing it in place with the Pan Head screws.(Indented side of the grill needs to face outward from the case.)12. Attach the four rubber feet to the corners of case with the Flat Head screws.(You have now completed the modification.)In my opinion, the docking station doesn't need a grill to protect the inward facing side of the fan because the lid and the drive you insert already do that — just be sure and turn off the power before opening the lid. The fan stops spinning in about three seconds, and only runs when there is a standard hard drive installed. It does not run if you insert an SSD drive because they don't get very hot and don't need the extra cooling. The docking station automatically senses if the drive you have inserted is an SSD or standard (spinning disc) hard drive.Note: If you decide you want to install an inner fan grill you can. Just remember it will make the grill on the bottom bulge out another quarter of an inch. If you do install an inner fan grill, be sure and insert it with the indented portion of the grill pointing towards the inside of the case.Things You Need To Know Before You Connect And Use The Sabrent Docking Station1. Insert your hard drive and connect all the cables to the case and your PC before you power it on.2. Turn off the power to the case before you disconnect the hard drive or cables.Note: Once you have powered down the docking station, you do not need to turn your computer off to disconnect it. Think of the docking station as a flash drive you have to power on to use and power off to disconnect.Some Useful Hints You Need To Read Before You Begin This Modification1. Don' t be in a hurry.2. Be careful when you pry open the bottom of the case. If you slip with the knife, you'll scratch it.3. It will be easier to remove the bottom of the case if you use a small, stiff wire that you have formed into a "J-style" hook and slide it into one of the holes left by the removal of screws. Pull up on it as you pry open the base. (A paper clip works great.)IMPORTANT — PLEASE READ:Before you put everything back together, take the appropriate screws (Flat Head or Pan) and semi-install them into the holes in the posts that hold the fan and the rubber feet in place. SCREW THEM IN ONLY HALF WAY to avoid stripping out the plastic threads and then remove them. Doing that, presets the screw hole and makes it easier for you to reinsert them when you do the final installation of the rubber feet and fan grill. However, be careful not to over-tighten them. To work properly, they only need to be tightened to the point that they are snug.One final note, when not in use, turn off your Sabrent Docking Station. It will help extend the life of your hard drives.It's just a guess, but I believe this modification almost triples the air flow — keeping your hard drive nice and cool. That's important if you have tons of data to transfer, as hard drives can get very hot if not properly cooled.By the way, the largest drive I have used in these docking stations is a 10 terabyte drive. So far, they have worked flawlessly.

Works great and fast on ide disks, and sata drives. While it states that it supports cd and dvd drives, I found that my IDE cd and dvd drive power and ide connector are too close together to connect to the adapter. The ide connection and the 4 pin power connector should be reversed, such that the ide is immediately on the end. I purchased a short ide extension, and 4 pin power extension, and filed down the tabs on the power extension, and was able to get it to work. Those part were difficult to find and bulky.

Buen producto.
2026-02-19    -Danniel_Mk4

Cumple lo que describe, fácil de usar.Solo conectas y queda listo.

Great product!
2025-12-23    -Michael M.

It’s easy to use and good value for money.I like that Sabrent provides firmware updates. Tip: Any capacity HDD (even 16 TB+) is now compatible after a simple firmware update if the firmware isn’t up to date. I suggest updating the firmware before simply claiming that the product doesn’t work and leaving negative feedback. The firmware update tool is on the downloads page on the Sabrent website.I booted Macrium Reflect 7 free to clone/image a laptops HDD to a larger capacity SSD and this EC-DFFN Dock did the job perfectly. I updated the firmware from 1.0.4 to 1.1.4 too. I haven’t used it with a 3.5” drive yet.I only had one problem after cloning the HDD to the SSD and although it wasn’t the docks fault, I’ll say it anyway as it may help others: I didn’t set MR to extend/expand the C: (Windows partition) so after cloning the HDD to the SSD there was a large amount of “unallocated space” at the end of the SSD with a partition between it and the C: but thankfully the “Extend Partition Wizard” in “AOMEI Partition Assistant” was able to fix it in seconds. If there’s no partition/s between them then it’s not really an issue as Windows can fix it and you won’t need an app like AOMEI to do it.

This is a brilliant idea. The HDD SATA drive I my old HP tower had most of my personal & media files. The tower rack had four small screws installed in the rails of the drive. You need to remove them. The SATA drive slides in smoothly & clicks securely in place. Either dismount or power off your PC before removing or swapping out the drive. The speed difference for USB3 versus USB3 is enormous. Check your USB ports to see which is truly set up for USB3. To see the configuration use something like a USB tree viewer. The Sabrent is solidly made with an excellent heavy cable. It plugged in & worked immediately. Nothing special to do. It appears as another drive in the drive list of the PC. I'm really pleased with this adapter.

댓글을 남겨주세요:

댓글 제목
댓글 내용
배송 및 반품
우리가 당신을 보호하겠습니다

대부분 지역에서는 배송비를 한 번만 지불하시면 됩니다 (주문 및 배송 페이지를 확인해 주세요).

구매 후 14일 이내 무료 반품 가능 (단, 수명이 다한 제품, 맞춤 제작 상품, 마스크, 향수 및 에어로졸과 같이 위험하거나 인화성 물질이 포함된 일부 제품은 제외).

수입 관세 정보

복잡한 절차는 저희가 처리해 드리겠습니다. 카나리아 제도를 제외한 모든 EU 국가, 영국, 미국, 캐나다, 호주, 뉴질랜드, 푸에르토리코, 스위스, 싱가포르, 한국, 쿠웨이트, 멕시코, 카타르, 인도, 노르웨이, 사우디아라비아, 대만, 태국, UAE, 일본, 브라질, 맨섬, 산마리노, 콜롬비아, 칠레, 아르헨티나, 이집트, 레바논, 홍콩 특별행정구, 바레인, 터키로 배송되는 상품 가격에는 모든 수입 관세가 포함되어 있습니다. 표시된 가격이 최종 결제 금액입니다.

예상 배송 시간

특급 배송: 7-10일

해당 창고에서 배송되었습니다.

더 자세한 정보가 필요하신가요?
반품 정책
반품 정책

저희는 제품 품질에 자신 있습니다. 만약 구매하신 제품에 완전히 만족하지 못하신다면, 수령일로부터 30일 이내에 간편하게 반품하실 수 있도록 정책을 마련해 두었습니다.

간편한 교환 또는 환불
  • 다른 사이즈, 색상 또는 스타일의 상품으로 교환하거나 전액 환불받을 수 있습니다.
  • 반품되는 모든 상품은 착용하지 않은 상태여야 하며, 원래 포장 상태 그대로 모든 태그가 손상되지 않은 상태여야 합니다.
간단한 절차
  • 온라인으로 반품을 신청하거나 고객 서비스 팀에 문의하여 도움을 받으실 수 있습니다.
  • 물품을 제대로 포장해 주시고, 원래의 포장 목록도 함께 넣어주세요.
  • 반품하실 상품을 보내주실 때에는 저희가 제공해 드린 선불 배송 라벨을 사용해 주시기 바랍니다.
  • 환불 요청 접수 즉시 처리해 드리겠습니다.

반품과 관련하여 궁금한 점이나 우려 사항이 있으시면 언제든지 저희 전문 고객 서비스 팀에 문의해 주세요. 고객 만족은 저희의 최우선 목표입니다.

범주
차이
제품
모든 제품 지우기